Showing posts with label miniature. Show all posts

Friday, 18 January 2019

Fallout kit bash


Wow, its been a whirlwind for me with so much going on! Finishing off the renovations for my craft room and working on this miniature fallout inspired kit bash at the same time.

There is a two part video series on this kit bash so you can watch me work and see some tips on how I achieved this completed project.

Watch the videos here...

Part one

Part two


Base house done and aging process of the floors and walls have begun.


Adding dirt and plants to the house really brought the abandoned house look together.


Here is the completed house in all its glory!


Best painting ever! Cute little magazines too.


I'm glad we moved on from bright yellow and green dining sets. I seriously hope we don't regress in the 2200s and go back to this awful colour scheme haha. Anyway, true to the fallout theme I painted the dining set to match the game.


You could still use these stairs right?


Mmmmm sugar bombs...


I was thinking that there should be a lamp or something on the bedside table. Thoughts?


Awwww look at the teeny tiny toilet.

Saturday, 29 December 2018

Craft room tour and update


Hey guys I'm back! Wow where to start?! So, basically, as I'm sure many of you have noticed, i haven't published a blog or a youtube video in a while. 12 months to be exact. 

I took a break from miniatures and blogging with pretty much no explanation on social media, which probably wasn't the best move. But, i promise i had good reasoning! I'm excited to be back doing what i love which is creating.

Why i took a break
Taking a break wasn't something that i had planned on doing. I fell fairly ill and I'm (finally) mostly recovered. Right in the middle of my illness, both my parents also had life threatening illnesses, to which they're both being treated for to this day.  While i was away from crafting my husband and i took the opportunity to renovate the dungeon (lol just a nick name, promise) down stairs to be my craft room. Now we can have the kitchen table back haha. 

Its still incomplete but the foundation is there now. Here are the progress shots!


Concrete floor, semi-passable brick walls and so many holes. We had to replace the left wall and make is structurally safe and rewired everything. There was a huge hole in the external wall too that needed to be sealed.


Once the building work was done it was time for paint. Lucky for me the person tinting the paint did a wonderful (cough not) job of having the sample match the paint. We ended up with a base coat that was 3x darker than requested. But we persevered and finished it off with a nice pastel purple called cloudberry.


I wanted to have one wall a feature. So i chose a marbled mermaid look using a few colours in a matching pallet. I hand painted the marbled wall and gently used a roller over the top to blend everything nicely.


Next the tricky bit. Using holographic gold paint, i hand painted scales over the entire wall. The effect of using this paint leaves a shiny and bright gold scale up close and from the other side of the room, the gold holo paint merges into the wall to appear marbled.


I'm fairly happy with my wall and should be lovely and calming for me to stare at when i need a break from crafting.


The majority of the furniture has also been built and it's ready to be populated with my crafty supplies! All of the furniture i chose was either white or a pale beige to match in with the walls and not distract away from the feature wall.

Do you see a sneaky gremlin chicken on the windowsill? Haha!


I still have to install a large art print, caulk peg board, desk accessories, bins etc before the room is complete. I'll be slowly finishing off my room in the next month and by then miniatures and youtube tutorials will be back!!

Now for the scary and large process of purging old craft supplies and organising my new room... I'll keep you all posted!

Tuesday, 4 December 2018

Native rescue and split of a dual queen


Hey hey! Been a while I know...

I was called out to an older gentleman's home month ago to inspect his Tetragonla hockinsi hive on fears that they have perished. Sadly they had. His hive was completely destroyed by small hive beetle (SHB), an invasive pest here in Australia brought over with the European honey bee. 

Australia's native bees do have ways of defending themselves against SHB by smothering invaders with sticky resins once they enter the hive. Older and more experienced hives are also better able to defend their entrances against SHB, however this doesn't help in the short term.  This is how new or inexperienced hives can be quickly devastated and overrun, despite how healthy they may initially be.

The good news is SHB in the Northern Tropics of Queensland tend to be more seasonal due to our extended periods of drought.  Once our periods of rain occur however, these little turds will stop at nothing to pick on our poor native bees.

In any case the gentleman I visited was in need of a new hive. He had made a native hive box himself out of reclaimed and untreated timber and I was lucky enough to have a hive myself on standby that was harboring two queens in a single hive.  This is not a common occurrence however the two queens were getting along just fine sharing workers and resources. You can see in the image below the two distinct brood clumps, both at different stages.


Since these little creatures were going into a new home they would need a little extra help defending their entrance. Usually i do this by inserting a small piece of U bend pipe into the entrance however I had run out of the right size during the time of the split, so I made an artificial one on the inside instead using some cerumen (native bee wax) I had cleaned and stored from previous rescues.


By making a temporary tube like this, the tiny bees have a smaller and elongated entrance to help defend their new home whilst cleanup and construction happens in the rest of the hive.


I also poured a thin layer of melted cerumen over the inside of the hive and squished a few larger droplets of wax randomly around to help give them something to build on and also some resources to use while they settle in.


Both halves of one brood was transferred into the new hive box along with some pollen pots in one corner and honey pots in the opposite corner. Unlike their southern counterparts, hockinsi in the tropics tend to prefer to have separated honey and pollen pots. The reason for this is still unclear however here we are with a few weeks rations of food and pollen with little spills. I only gave a small amount as both hives will be swapped daily to share workers while repairs occur over the next week or two. This will help boots immediate numbers, reduce clean-up time and give the new hive a little boost while the new hive grows.


After 3 days the little bees have almost entirely cleaned up their entrance hole and have reasonably defended their new home. Once the new hive has enough numbers without the support of the original, i will be sending these little critters to their new gorgeous home, where no doubt they will be cared for. I will be checking on them every few months just to make sure they grow and become a healthy and strong hive.


Just to finish the day, my chickens got a frozen yogurt treat to beat the heat! The good little girls kept away from my natives while I was doing the transfer so they definitely deserved a cool reward.

(left to right) Gremlin, Kiev, Schnitzel and Parmigiana

Tuesday, 5 December 2017

Tiny sushi

Hey everyone!

My lastest video tutorial is how to make sushi using polymer clay.  Check out the video!


I haven't posted a video in a while as I haven't been well enough to voice record nor did I have a steady enough hand to work on my minis. Anyhoo here are a few photos to preview before you watch the video =) 

If you do any recreations drop me a tag on Instagram!


Monday, 11 September 2017

DIY Cardboard Cat house! Update + Apology!

Hey everyone! Where have I been!? I do apologise for suddenly disappearing, however the reason why is an interesting and very lucky story.

I am a part of my local bee keeping group and went for my first visit a few months ago. Never seen a bee hive before so of course they took a liking to my fresh new face and decided to sting me 6 times. Poor girls...

Anyhoo about an hour or so later, I developed vertigo and some mild chest pain which (at first) felt only little more than some bad stomach pain. So I decided to call an Ambulance anyway, just in case I was allergic to bees. Wasn't the case but boy was I lucky anyway.

After multiple blood tests and being hooked up to an ECG machine for 5 hours the doctors diagnosed me with a Pulmonary Embolis. That's a big ol' blood clot in my lungs. For may people...a death sentence and I'm still so very young.

I stayed overnight and as soon as a new doctor came in for his shift I was discharged. Not something that should have happened, but that's another story. So anyway I was monitored by my private doctor intensively for a few weeks while I had regular blood thinner injections in the stomach and multiple xrays of my chest to monitor what was going on. By this stage my breathing deteriorated a little but the blood clot was dissolving. Semi good news!

Unfortunately because of all this business I developed a mild infection and chronic asthma which may be permanent in some capacity. I'm still undergoing treatment so the extent is something to discover at a later date. I was prescribed some heavy immune killing steroids, usually reserved for cancer patients, some antibiotics and several "puffer" style steroids for my lungs.

After several weeks of this I'm walking, talking, breathing and still living. The blood clot is long gone although the cause is still a giant mystery, and I'm starting to talk very well without much breathing difficulty. Although my chronic cough is still around. So I will be picking up my video's shorty =)

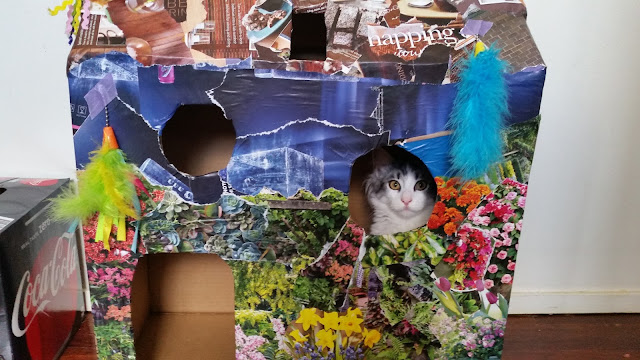
On to my latest project! I'm still a little shakey so miniatures are not on the table for the time being. I ordered a new computer (mine was like 8 years old anyway) and it came in a HUGE cardboard box. Which my new kitten tempest adored. So I decided to make a little home for him.


Excuse the mess! I cleaned up all the packaging and tape stuck to the edges and taped down the top flap to be more roof-shaped. Cut out a few holes for a door and some windows and the basic shape was done.


Despite the fact that this will be obliterated by my cats, I decided to decorate it anyway. What would be more fitting than using pages from my local Better Homes and Garden's magazines that I had been collecting for months. God knows why.


I did however run into a few issues. Tempest wanted to help the best he could and would often swipe or slap my hands as I tried to glue down pieces of page to the box.He also took pride in bringing me pieces from my discard pile.


Don't worry I used non-toxic children's glue. Safe to eat! I probably ate a lot of this as a child anyway. As most kids do.


Finally my project was complete! Tempest has a new house to destroy and attack me from as i walk past to the bedroom. He seems to like it.


Of course he needs a few of his favorite toys taped to the sides. I decided not to make this permanent as he carries them around at night and wouldn't be fair to take that from him.


Yeah i would count the box as a success. I sealed the box with a single coat of the non-toxic glue and the box was ready to be kitten tested.


Tempest was a feral which I found during a storm and pulled from a drain. Check out his page for more information!

Hope to see you guys in my next tutorial =)

Tuesday, 13 June 2017

Potatoes

Hey everyone! My latest tutorial is now on youtube.


Special guest is Tempest. As he is still very young, he stays with me at all times.


Please excuse his messy breakfast face!

Here is the video. Thanks for watching!


Tuesday, 30 May 2017

Pasta and kitchen update

My latest tutorial is now available for viewing! Learn how to make miniature pasta in 12th scale using polymer clay.


Here are a few quick photos of the pasta packages in my kitchen room box.


 All of items in these photos have a tutorial on my youtube channel. Go check it out!


Fully functional and super small paper towel with dispenser and a few pans.


Baking paper, aluminum foil rolls, sponge and books!


 Also learn how to make super adorable kettle and matching toaster complete with cords!


Tuesday, 29 November 2016

Camera death

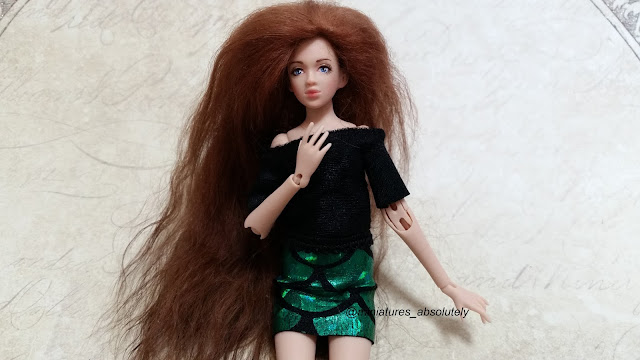
Hay everyone! I have some terrible news. While filming my next youtube tutorial on my brand new adorable miniature ball jointed doll, my camera desired to commit seppuku! It froze up and even melted the SSD card inside. Couldn't possible break my heart more...


I will be taking it (throwing it out) to a technician tomorrow in the hopes that the SSD card data can be recovered somehow. Otherwise I'll make another ball jointed doll showcase and tutorial as soon as I can.

Just a little frustrating about my camera...just look how cute my BJD is! I was really looking forward to showing her off this week.


She's crazy tiny and a lot sturdier than I expected. Mind you that's not an invitation to be rough, she's still delicate haha.


Her face is very well painted and fixated well, so it was nice not having to bee too concerned about damaging her make-up while painfully trying to dress her. I was more scared of breaking something than anything else.


My god is her hair fluffy though. I believe its made of angora goat hair, and the wig cap itself looks to be leather or part of the original hide. I plan on putting some keratin oil in it just to minimise the fuzzy fly-aways in the future.


I'll let everyone know as soon as I order a new camera and it has been delivered.. ho hum
Dont forget to check out solersart's shop on ebay to get your very own miniature ball jointed doll!

Monday, 24 October 2016

Fridge

I have been working on a miniature 1/12th scale fridge to go with my room box that you see frequently on my youtube tutorials. Short of doing up a template myself I used one that was already done and perfectly suited the size of my mini kitchen. I have been a subscriber to Kris' 1 inch minis blog for quite some time and I was delighted to discover that Kris did some work on a double door fridge. Check out Kris' post here: goo.gl/bDqc0i

This was the basic template I used. I did add a few extras however.


Here is my re-creation


Instead of having the fridge door and freezer compartment fixed, I decided to add some pin hinges. The notebook attacked to the fridge has a tutorial available on my youtube channel.


I wanted my fridge to suit my bench tops, which is why I changed my mind about steel and sprayed it black instead. Also the handles I made are less fancy than that Kris made. They're just toothpicks and dowel.


Inside has a simple divider down the middle and some shelves on the left made from ply. The baskets I made from polymer clay. I also added a shelf area to the right door. I didn't add any to the left otherwise the door wouldn't be able to close.


The freezer drawer is just a simple box drawer. I still have to fix up a small area that got a bit black from over spray, however its at the bottom of my list to do since you can't see it anyway =)

Keep miniaturing on everyone!