Showing posts with label 1:12 scale. Show all posts

Thursday, 24 January 2019

Prom gown


One of the things I love best is the feeling that I am helping others to learn and enjoy sewing. I try to encourage anyone I can to this end.

Here is a requested prom gown tutorial that is very simple and easy to follow.  Learn how to make your own pattern to suit the type of doll you want to make the dress for!


Watch the full video here:


Tuesday, 5 December 2017

Tiny sushi

Hey everyone!

My lastest video tutorial is how to make sushi using polymer clay.  Check out the video!


I haven't posted a video in a while as I haven't been well enough to voice record nor did I have a steady enough hand to work on my minis. Anyhoo here are a few photos to preview before you watch the video =) 

If you do any recreations drop me a tag on Instagram!


Tuesday, 13 June 2017

Potatoes

Hey everyone! My latest tutorial is now on youtube.


Special guest is Tempest. As he is still very young, he stays with me at all times.


Please excuse his messy breakfast face!

Here is the video. Thanks for watching!


Tuesday, 30 May 2017

Pasta and kitchen update

My latest tutorial is now available for viewing! Learn how to make miniature pasta in 12th scale using polymer clay.


Here are a few quick photos of the pasta packages in my kitchen room box.


 All of items in these photos have a tutorial on my youtube channel. Go check it out!


Fully functional and super small paper towel with dispenser and a few pans.


Baking paper, aluminum foil rolls, sponge and books!


 Also learn how to make super adorable kettle and matching toaster complete with cords!


Tuesday, 29 November 2016

Camera death

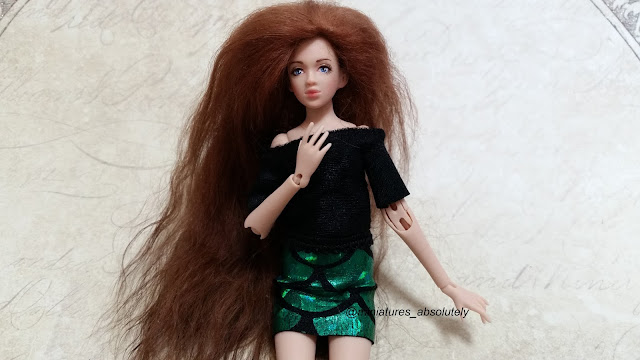
Hay everyone! I have some terrible news. While filming my next youtube tutorial on my brand new adorable miniature ball jointed doll, my camera desired to commit seppuku! It froze up and even melted the SSD card inside. Couldn't possible break my heart more...


I will be taking it (throwing it out) to a technician tomorrow in the hopes that the SSD card data can be recovered somehow. Otherwise I'll make another ball jointed doll showcase and tutorial as soon as I can.

Just a little frustrating about my camera...just look how cute my BJD is! I was really looking forward to showing her off this week.


She's crazy tiny and a lot sturdier than I expected. Mind you that's not an invitation to be rough, she's still delicate haha.


Her face is very well painted and fixated well, so it was nice not having to bee too concerned about damaging her make-up while painfully trying to dress her. I was more scared of breaking something than anything else.


My god is her hair fluffy though. I believe its made of angora goat hair, and the wig cap itself looks to be leather or part of the original hide. I plan on putting some keratin oil in it just to minimise the fuzzy fly-aways in the future.


I'll let everyone know as soon as I order a new camera and it has been delivered.. ho hum
Dont forget to check out solersart's shop on ebay to get your very own miniature ball jointed doll!

Monday, 24 October 2016

Fridge

I have been working on a miniature 1/12th scale fridge to go with my room box that you see frequently on my youtube tutorials. Short of doing up a template myself I used one that was already done and perfectly suited the size of my mini kitchen. I have been a subscriber to Kris' 1 inch minis blog for quite some time and I was delighted to discover that Kris did some work on a double door fridge. Check out Kris' post here: goo.gl/bDqc0i

This was the basic template I used. I did add a few extras however.


Here is my re-creation


Instead of having the fridge door and freezer compartment fixed, I decided to add some pin hinges. The notebook attacked to the fridge has a tutorial available on my youtube channel.


I wanted my fridge to suit my bench tops, which is why I changed my mind about steel and sprayed it black instead. Also the handles I made are less fancy than that Kris made. They're just toothpicks and dowel.


Inside has a simple divider down the middle and some shelves on the left made from ply. The baskets I made from polymer clay. I also added a shelf area to the right door. I didn't add any to the left otherwise the door wouldn't be able to close.


The freezer drawer is just a simple box drawer. I still have to fix up a small area that got a bit black from over spray, however its at the bottom of my list to do since you can't see it anyway =)

Keep miniaturing on everyone!

Thursday, 20 October 2016

Halloween cake

Check out this week's miniature tutorial on how to make a tiny 3 tier polymer clay cake in 1:12th scale!


New tutorials every week!


I'm now on facebook! Come check me out https://www.facebook.com/MiniaturesAbsolutely/

Wednesday, 28 September 2016

Room box kitchen

Hey everyone! I have been working on a miniature kitchen which I wont be doing a tutorial on. The kitchen is a 45cm x 25cm x 28cm room box made of base wood. The floor is match sticks that I sanded and stained then coated with varnish.

 
The cabinets were made from a combination of balsa and base wood, and all doors are fixated with a pin instead of a standard hinge. 


The table I made however I purchased the chairs off ebay for $2 including shipping. Each handle is made from strips of aluminium and painted with copper paint.
 The sink is for decoration only and does not work and made from a piece of aluminium that was hammered out.


The stove and ramge hood are balsa and painted black. The stove elements are pieces of wire that have been bent to simulate gas filaments. 
I also installed a small hook stand next to the stove to hang utensils in the future.


For now the only decoration I have complete is a loomed rug which I will have a tutorial on youtube for next week.

I will have to start working on a fridge now =)

Saturday, 24 September 2016

Vertical pallet garden

Hey everyone! I recently uploaded another tutorial on youtube on how to make a miniature vertical pallet garden. The vertical planter project has taken pinterest by storm and there are many DIYs on how to make you own. Now I will show you how to make one in 1:12 scale miniature for your dollhouse.

If you prefer your pallet to be a little bit larger to suit barbie or monster high, simply double the measurements. All details and measurements are listed on the video's description as well.

Direct link: https://www.youtube.com/watch?v=MEjCHFBI9AY


Have a great day everyone! =)

Wednesday, 31 August 2016

Samsung S5

Hi guys! This entry is a little different to my normal posts, in that I have opened a youtube channel!


I have created a 1:12 scale miniature Samsung S5, replicating my current phone. I swear that google doesn't pay me for their sponsorship haha. Anyway, this adorable miniature will be used in my room box projects whose details will be posted in the near future.


If only this tiny phone really worked...it's so adorable!


Further details and a video tutorial for this miniature can be found below. Hope you enjoy! :)


Monday, 29 August 2016

Victorian suite

Hi Guys! I made a 1:12 scale miniature Victorian lounge suite complete with tiny table. Apologies for not completing a step-by-step for the beginning of the project, I simply forgot T.T

Essentially what I did was create a template for my design on paper and roll out thin strips of polymer clay and cut out each template before baking. I pre-baked each piece separately and the assembly as well as the arm rest pieces were completed at the same time, using liquid polymer to join each piece together.

After baking this is the progress so far...


I gave each piece a very light sanding to rough up the smooth, shiny surface and give a more realistic wood grain finish. Then i gave it a very light coat in paint primer. The primer I used is from citadel paints as it is nice and dark, showing up the darker undertones of the wood as well.


Here is the progress after the wood stain has been completed and the gold trims have been brushed.


I opted out of fabric as all I had in stock was of a low thread count. For tiny furniture such as this, high cotton thread count or non-fraying material is preferred to minimize the bulkiness. I think textured finish like this turned out nicely though. ^^


I will be putting these cute little pieces up for sale in the near future on etsy, so stay tuned!


Turtle terrarium

Hey everyone! I have been working on a miniature turtle terrarium for a friend. She is a little mad for turtles =)


I decided to make this project 6 cm (2.3 in) x 4 cm (1.5 in). I started by rolling out a sheet of old polymer clay. Any color is fine as it will be covered up. I did a full bake and let it cool. Using some thick and flexible packaging that I had, I cut a single sheet for the back at 6 cm (2.3 in) x 4.5 cm (1.7 in) high, and a longer strip to cover the front and two sizes. I bent the plastic into shape using a small blow torch. Then using poly cement I assembled it as in the photo below.


Using a match that i split into two pieces I added them to the back to hide the join of the glass. For the inside I decided to go with items I found in my local hobby store, Townsville Hobbies. You can check out their google page here. I started by mixing together tacky glue and the fine sand to make a thin layer along the bottom, making sure to fill the edges, acting as a sealer for when I use resin later.


Once that set I added a thicker layer of my sand mixture to one side, I added a few super dry twigs that I found in my garden. If the twigs were green that can affect the clarity of the resin when I add that later.


Using a couple of sprigs of the lichen i carefully attached them to the hardening glue using a needle tool. I also added some 'grass' which is actually just fibers that I pulled from a coarse brush and trimmed to size.


Finally I added some card stock to the bottom rim just to hide the seams.


There are a lot of finger prints on the glass but that will disappear before I add the resin. I'm letting this dry for a full 2 days before I add any resin.

The resin I used was Diggers industrial casting resin, however any kind of resin you have on hand will be adequate. I mixed the resin as instructed and slowly dripped it in using a paddle pop stick. Just enough to cover 1 mm or 0.3 in of above the sand. I let that tack and added the turtles. I put a few drops of resin under the turtles to reduce bubbles from forming before I put them in. Once the turtles were in the position I wanted I slowly filled the remainder of the resin just to the tips of the turtle's noses. While the resin was still wet, I used a toothpick to create waves to simulate water movement.

Once the resin was dry after 24 hours, I went on to make a lid. I used a piece of base wood I painted black to match the base. I carved out a little slot to fit two hinged I found at a craft store.


Using a strip of the same card stock I used for the base, I glued it to the edges of the lid, leaving enough edge to fold over. I also attached the tiny hinges.


Card stock folded over on the top of the lid only, the bottom side will remain as it is.


Once the lid was completely dry, I attached it to the terrarium using poly cement glue.

Now my turtle haven is complete!


Hope you enjoy =)