|
| Original hive box and location - 2017 |
I had this hive of
Tetragonula hockingsi (Australian sting-less bee) come into my possession 2 months ago and were in badly need of a new home. They originally belonged to my parents in law and were rescued from a brick wall roughly 23 years ago. They have remained in this old letterbox since.
This is the original hive. It has lasted for years but sadly was not going to last much longer. I taped up the hive and transported it 4 hours to their new home...my garden.
I was originally hoping to do an eduction transfer where a new home is connected to the old. The little bees will slowly build in the new box and then one hive will turn in to two!
Unfortunately in the 2 months i had the hive, the top had to be taped down and the front panel has fallen off. There was only so much liquid nails I could use before the old hive was no longer viable so I decided to do a full transfer. As some of you may know, I have been terribly sick this past few months so doing a transfer alone would be too much for me. So I called a friend and his family who have been working with bees for many years to help.
 |
| Front entrance defense |
The bees have been defending this hive for so long that they had 5 entrances. I had managed to reduce their entrances down to 2 in prep for the eduction transfer. The guard bees are so cute defending their home. They do this as they do not have bum stingers like the European Honey Bees do. So instead they guard the entrance holes and make elaborate entrance tubes to better defend their brood.
 |
| Photo original C.Horne - Back entrance defense |
Time to open the old box. The bees had batumen down the lid fairly well since I taped it and thankfully the wood came off in one piece rather than crumble apart. The hive usually lives nearby so any bees that get displaced won't have too far to travel to find home.
 |
| Photo original C.Horne - The Horne boys cracking open the hive. |
 |
| Photo original C.Horne - hive reveal. |
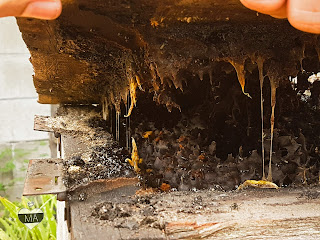
The hive had just started to be co-inhabited by tiny ants which will eventually pose a threat if left alone.
You can see just how much propolis was gluing the hive lid down. These bees have been collecting plenty of resources and have almost entirely run out of room.
Unlike honey bees, these Australian natives use propolis extensively throughout their hive instead of pure bees wax.
.
 |
| Photo original C.Horne - Pollen and Honey 'pots' glued to the hive roof. |
This old hive has the biggest food storage I have ever seen. Not that I have seen a plethora mind you. I had a quick taste of their sugarbag honey pots which was like a tangy orange sherbet. They are directly below a mandarin tree so no surprise there. Sugarbag honey is very unique and unlike regular Honey Bee honey that you buy in a supermarket. Australian Stingless Bee honey is stored in clusters of resin pots which adds a variety of flavors. This is usually citrus like but can even have hints of eucalyptus. Sugarbag honey is very rare and each average hive will only produce 1kg a year. By comparison the the European Honey Bee can produce 27-45kg of honey a year!
 |
| Photo original C.Horne - Ant infestation clearly visible. Rear entrance tube to the right is also clear. |
Stingless bee honey is sometimes fizzy when first collected as can be seen in the photo below left.
 |
| Photo original C.Horne - Honey pots. |
 |
| Photo original C.Horne - Massive rear entrance tube. |
This species of stingless bee have a semi-comb brood which is usually covered with an involucrum. A soft like waxy propolis that smells of the queen. Great for covering the new hive enterance in so the bees can smell where home is. As I live in the tropics and it is currently summer, there is little to no brood covering though.
 |
| Photo original C.Horne - Semi comb brood mass and support structures of Tetragonula hockingsi |
Here I am working on a piece of propolis to wrap around the new hive entrance. It's a bit like polymer clay in that the more you work it, the stickier and more malleable it becomes.
 |
| Photo original C.Horne - fully exposed hive. |
 |
| Photo original C.Horne - Me forming attack plan. |
After the Horne family opened the hive for me we originally decided that this hive was large enough for a split. We couldn't see the advancing front so decided to proceed with a vertical cut.
 |
| Photo original C.Horne - Releasing the hive mass from the box walls. |
 |
| Photo original C.Horne - Brood removal |
After we began to remove the brood however, the mass was too small to split after all so the entire brood was moved to a single hive. Cutting the brood like this is normally less than ideal and the most popular method is a horizontal split. Transfers have been successful using this method and poses little difference to a successful hive transfer. If an advancing front was easily visible no vertical cut would have been made.
Don't worry, the bees will be fine! They are very clever and brilliant cleaners.
Once the brood was removed it was placed gently in their new home. The box I chose for them was designed by Sarah Hamilton of
Bee Yourself in Brisbane, Queensland. Check out her website for more information on the work that she does with Australian Natives!
.
 |
| Photo original C.Horne - Pollen pot |
 |
| Photo original C.Horne - Transfer of food and brood mass to new hive box. |
Once the brood was placed in the new hive and a good supply of honey and pollen put around the edges, the box was sealed up with tape. This is to minimize the risk of invaders while the little bees set up their new home. Some propolis was put around each opening, with the top entrance being completely sealed.
 |
| Photo original C.Horne - little bees flying around and working their new hive entrances. |
It did not take them long (5 minutes) to chew up the propolis on the top entrance and move it inside. They readily accepted their new hive and within 10 minutes had already begun collecting pollen from outside sources. A good sign!
 |
| Photo original C.Horne - Stingless bees working on their new hive entrances. |
Stingless bees make great pets and excellent pollinators. I'm crossing my fingers and toes, hoping that this was a successful hive transfer. Considering their activity and excitement over their new hive, I'm certain that they will be happy in their new home. It provides much more room and better defense against those pesky ants! Thanks to the Horne family for helping me with the transfer. There is no way I would have been able to open this hive solo considering how sick I have been and am still recovering.
 |
| Photo original C.Horne - Little message from my cute tiny bees! |
I will post an update in a few months once the bees have had a chance to settle in and make their home to their liking.